Continuous integration and deployment for iOS bring confidence to developers when shipping products to customers. TestFlight makes it easy for developers to publish apps to early beta testers, and Semaphore is a fast CI/CD service that supports iOS deployment to TestFlight.
This article outlines the steps for both the integration and deployment pipelines. You can read the detailed iOS integration guide here.
Prerequisites
- An existing Flutter project; you can use our starter app or create one by running:
flutter create my_app - An Apple Developer Account (a.k.a. developer account) for the developer certificates and provisioning profiles–costs $99/year
semaphoreci-demos/semaphore-demo-flutter2
Preparing a Flutter (iOS) App
TestFlight
Previously, we discussed how to release your Flutter (iOS) apps to Firebase using Adhoc releases. Now, we will create an iOS deployment using App Store releases that allow us to upload and the process builds to TestFlight.
TestFlight is a tool created by Apple that offers seamless beta testing for developers. Users can download the TestFlight app and join beta testing using an invitation or public link.
During internal testing, builds are sent out immediately to the developer account members after build processing . You can invite up to 100 testers per beta test.
For external testing, if you have users outside your developer account, it takes 24-48 hours for the review to finish before your users can download and test the new build. You can invite up to 10,000 testers per beta test.
Creating a new bundle identifier
Bundle identifiers or bundle IDs allow you to uniquely identify your apps. In most cases, if you have already opened your app in Xcode and assigned a developer team to Signing and Identities, the bundle identifier has already been created in your developer account. If it isn’t available on your developer account, you can create a new one.

Creating a new app
After creating the bundle identifier for your app, it’s now time to create the app on App Store Connect, where you will also manage app store listings and releases.
Make sure to reference the correct bundle identifier.

Assigning the bundle identifier
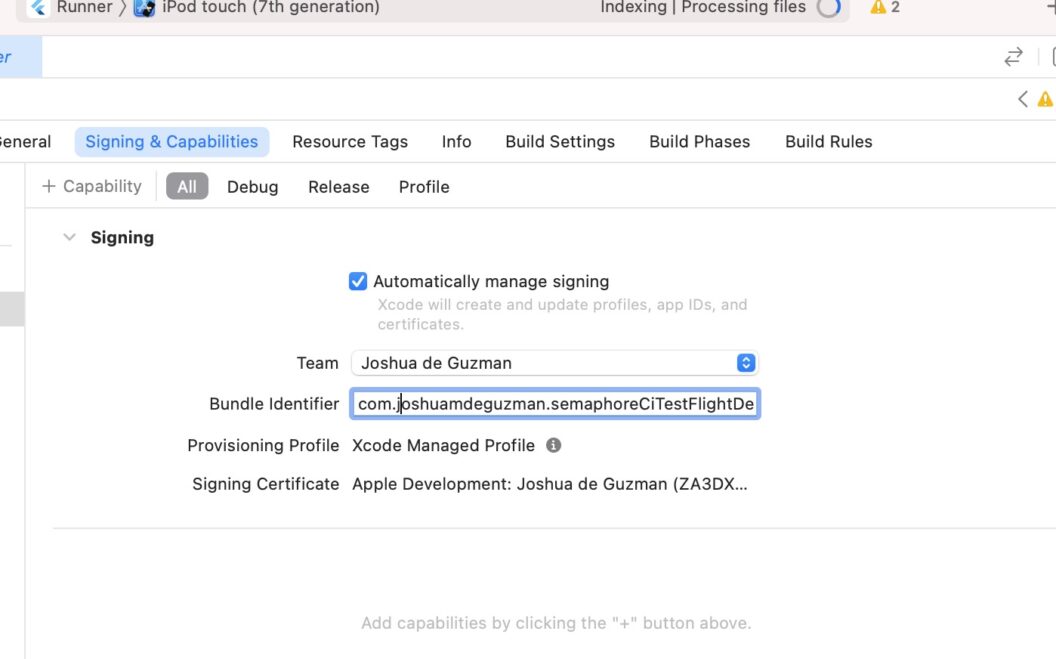
Now, navigate to the ios directory and open Runner.xcworkspace. Use the same app bundle identifier you added to App Store Connect earlier.

Setting up fastlane
fastlane is an open-source tool that simplifies the complex process of creating releases for mobile. For iOS, it comes in handy with the tool called fastlane match, which does all the heavy lifting of managing iOS certificates and provisioning profiles.
Installation
Before continuing, make sure you have fastlane installed on your development machine. If you don’t, follow the steps outlined here to install it.
Setting up fastlane for iOS
To initialize fastlane, run the following:
cd ios && fastlane init && cd
Select manual setup:
What would you like to use fastlane for?
1. 📸 Automate screenshots
2. 👩✈️ Automate beta distribution to TestFlight
3. 🚀 Automate App Store distribution
4. 🛠 Manual setup - manually setup your project to automate your tasks
>>> 4
Last, wait for all the packages and dependencies to be installed properly. Initializing fastlane will create the Appfile and Fastfile files to configure your fastlane workflows.
Setting up fastlane match
To initialize fastlane match, run the following:
fastlane match init
Next, select git to store the developer certificates and provisioning profiles:
fastlane match supports multiple storage modes, please select the one you want to use:
1. git
2. google_cloud
3. s3
Then, enter the URL of your git repository, e.g.https://github.com/joshuadeguzman/ios-certificates
Next, you will be prompted to enter a match password. Finally, replace development to appstore in your Matchfile
type("appstore")
Generating fastlane match credentials
Now that you have set up a fastlane match, it’s time to generate the provisioning profiles and certificates for your app.
In your Matchfile, set app_identifier to your bundle identifier:
app_identifier(["com.yourapp.example"])
Next, you need to run:
fastlane match appstore
or you can also specify specific bundle IDs if you have multiple build flavors, as shown below:
fastlane match appstore -a com.yourapp.example
Next, you will be prompted to enter your Apple Credentials and Git URL. This step will generate the files and upload them to your private Git repository, and will also download the files to your local machine.
Finally, use the provisioning profiles installed on your machine for the Release build variant.

Setting environment variables
Below you can see an example of how Fastlane loads environment variables.
example_value = ENV["EXAMPLE_VALUE"]
ENV is a keyword that represents an environment variable. You can use this to prevent sensitive information like API keys or tokens from being committed to the file. Semaphore supports the use of environment variables.
To create an environment variable on Semaphore, you will use sem. Read this to learn how to use the sem CLI. After installing sem CLI, you need to connect your Semaphore account using sem connect. If you don’t have a Semaphore account, you can take the guided tour and set one up.
Next, you’ll need to prepare the values for the following environment variables:
MATCH_GIT_URL: this is the URL you assigned to the fastlane match during initialization.MATCH_PASSWORD: this is the passphrase you assigned to the fastlane match during initialization.MATCH_GIT_AUTHORIZATION: Git authorization value is a combination of your username and your personal access token. It allows Semaphore to have access to your provisioning profiles and certificates that are generated by fastlane match. You can create your personal access token here. For example,<your_username>:<your_personal_access_token>.FASTLANE_USERandFASTLANE_PASSWORD: these are the login credentials you use for accessing a developer account in Apple, whether it’s for personal use or within a developer team.FASTLANE_APPLE_APPLICATION_SPECIFIC_PASSWORD: if your account has 2FA enabled, you should create an app-specific password for Semaphore.
To do this:
- Go to http://appleid.apple.com.
- Click on Passwords.
- Then, click on “Generate App-Specific Password”.

- Then, click Create.
- Next, use sem command to create the environment variables in Semaphore:
sem create secret semaphore-flutter2-env \
  -e MATCH_GIT_URL="<YOUR_MATCH_GIT_URL>" \
  -e MATCH_PASSWORD="<YOUR_MATCH_PASSWORD>" \
  -e MATCH_GIT_AUTHORIZATION="<YOUR_GIT_AUTHORIZTION_TOKEN>" \
  -e FASTLANE_USER="<YOUR_APPLE_ID_EMAIL>" \
  -e FASTLANE_PASSWORD="<YOUR_APPLE_ID_PASSWORD>"\
  -e FASTLANE_APPLE_APPLICATION_SPECIFIC_PASSWORD="<YOUR_APPLE_APP_SPECIFIC_PASSWORD"
Learn more about Semaphore’s environment variables in the documentation.
Finally, add the following environment variables to the topmost part of your Fastfile:
git_authorization = ENV["MATCH_GIT_AUTHORIZATION"]
team_id = ENV["TEAM_ID"]
app_id = ENV["APP_ID"]
app_identifier = ENV["APP_IDENTIFIER"]
provisioning_profile_specifier = ENV["PROVISIONING_PROFILES_SPECIFIER"]
temp_keychain_user = "temp"
temp_keychain_password = "temp"
Creating fastlane deploy lane
Let’s go ahead and set up workflows on fastlane.
First, you need to add the following command below the environment variables:
# This is where the environment variables are located

(truncated)

# Add the following

def delete_temp_keychain(name)
  delete_keychain(
    name: name
  ) if File.exist? File.expand_path("~/Library/Keychains/#{name}-db")
end

def create_temp_keychain(name, password)
  create_keychain(
    name: name,
    password: password,
    unlock: false,
    timeout: 0
  )
end

def ensure_temp_keychain(name, password)
  delete_temp_keychain(name)
  create_temp_keychain(name, password)
end
This will be used to create temporary keychains when storing your app provisioning profiles and certificates on the CI machine.
Next, just below the keychain commands, add the following:
platform :ios do
  lane :deploy do
    # Step 1 - Create keychains
    keychain_name = temp_keychain_user
    keychain_password = temp_keychain_password
    ensure_temp_keychain(keychain_name, keychain_password)

    # Step 2 - Download provisioning profiles and certificates
    match(
      type: 'appstore',
      app_identifier: app_identifier,
      git_basic_authorization:  Base64.strict_encode64(git_authorization),
      readonly: true,
      keychain_name: keychain_name,
      keychain_password: keychain_password
    )

    # Step 3 - Build the project
    gym(
      configuration: "Release",
      workspace: "Runner.xcworkspace",
      scheme: "Runner",
      export_method: "app-store",
      export_options: {
        provisioningProfiles: {
            app_id => provisioning_profile_specifier,
        }
      }
    )

    # Step 4 - Upload the project
    pilot(
      apple_id: "#{app_id}",
      app_identifier: "#{app_identifier}",
      skip_waiting_for_build_processing: true,
      skip_submission: true,
      distribute_external: false,
      notify_external_testers: false,
      ipa: "./Runner.ipa"
    )

    # Step 5 - Delete temporary keychains
    delete_temp_keychain(keychain_name)
  end
end
A few things to note here:
- Keychains (Steps 1 & 5): This will allow you to store your app provisioning profiles and certificates.
- Download provisioning profiles and certificates (Step 2): This step reads and downloads the provisioning profiles and certificates from the private Git repository you created during fastlane match initialization. This uses your Git authorization credentials.
- Build the project (Step 3): This step builds your project manually by specifying the bundle identifier and provisioning profile explicitly.
- Upload the project (Step 4): This step uses the environment variables you set for the
FASTLANE_USER,FASTLANE_PASSWORD, andFASTLANE_APPLE_APPLICATION_SPECIFIC_PASSWORDto authenticate the CI and upload your builds to the App Store or TestFlight.
Setting skip_waiting_for_build_processing and skip_submission to true will allow the CI to finish early without waiting for the build processing to finish. This should come in handy when you pay for a CI that charges for usage time like Semaphore. More on this can be read here.
Deploying to Semaphore
We’re now going to automate our deployments using Semaphore. Semaphore supports a wide-range of platforms and programming languages and is reliable and fast for your mobile development needs. Semaphore is fast and works well for mobile app distribution with TestFlight.
I’ve written a detailed guide on the Semaphore workflow visual builder here.
Creating your Semaphore project
- In the navigation bar, click Create New +.
- Then, select the repository of your project.
- Next, click Customize to manually set up your workflows.

Setting up continuous integration pipeline
Your continuous integration pipeline will check if a change is stable before merging it into the main branch by running a series of build checks, lints and tests.
Let’s set up the continuous integration pipeline to use a Mac-Based Virtual Machine agent, because we are building for iOS.

Install the Dependencies Block
Create a block named Install Dependencies, then add a job called Install and cache Flutter:
checkout
cache restore flutter-packages-$SEMAPHORE_GIT_BRANCH-$(checksum pubspec.yaml),flutter-packages-$(checksum pubspec.yaml),flutter-packages
flutter pub get
cache store flutter-packages-$SEMAPHORE_GIT_BRANCH-$(checksum pubspec.yaml),flutter-packages-$(checksum pubspec.yaml),flutter-packages /root/.pub-cache

Lint Block
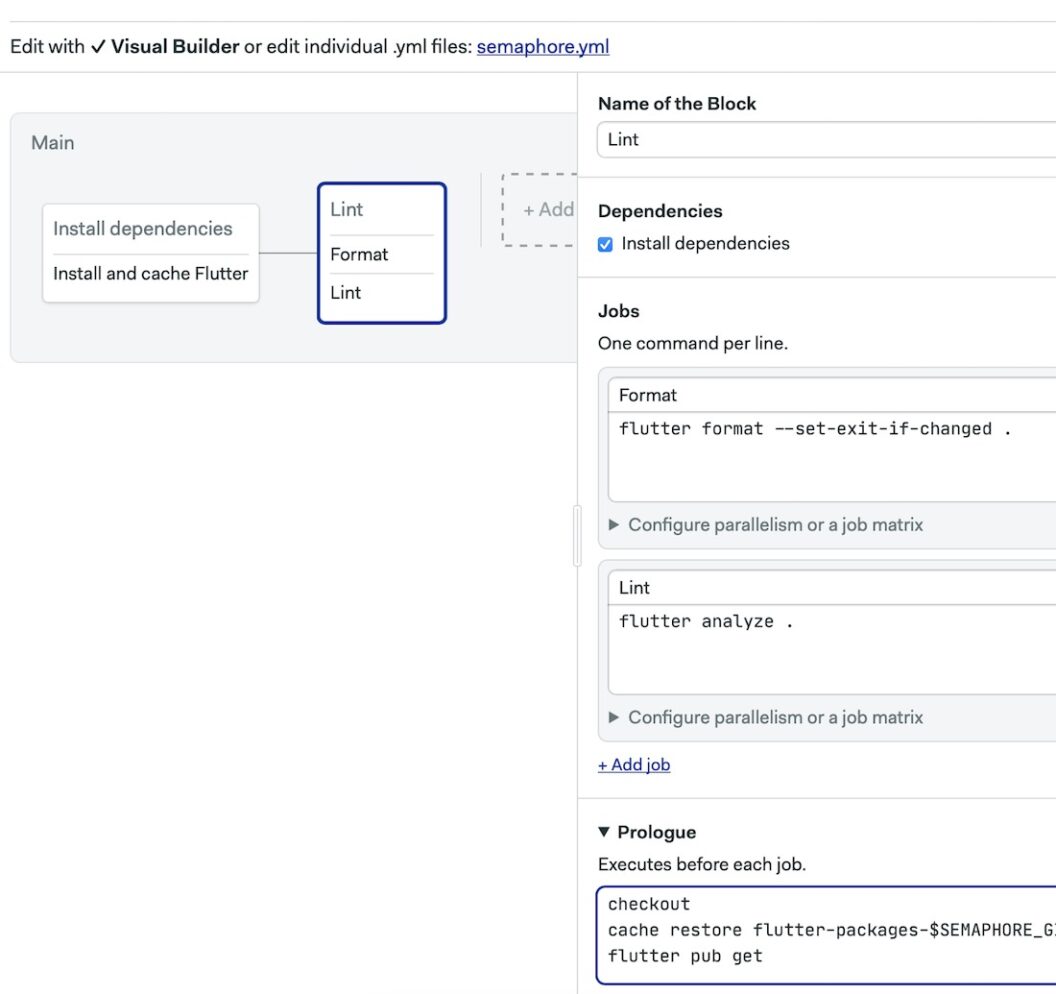
Add a new block named Lint with two jobs: Format and Analyze. Their respective commands are:
flutter format --set-exit-if-changed .
flutter analyze .
The prologue of the block should be:
checkout
cache restore flutter-packages-$SEMAPHORE_GIT_BRANCH-$(checksum pubspec.yaml),flutter-packages-$(checksum pubspec.yaml),flutter-packages
flutter pub get

Test Block
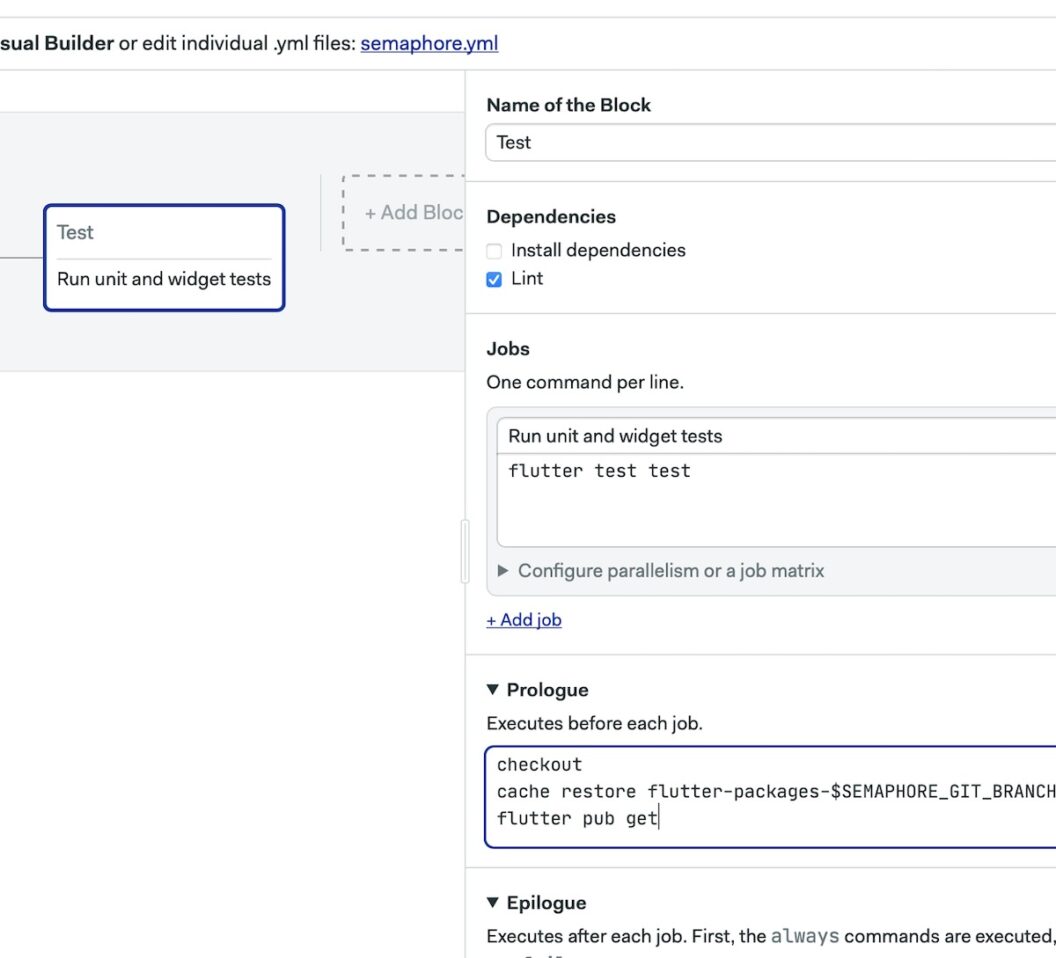
Add a block to run your Flutter tests. It has one job to run the unit tests:
flutter test test
The block’s prologue should be:
checkout
cache restore flutter-packages-$SEMAPHORE_GIT_BRANCH-$(checksum pubspec.yaml),flutter-packages-$(checksum pubspec.yaml),flutter-packages
flutter pub get

You can now test your workflow by clicking Run the workflow.
Setting up continuous deployment pipeline
Your continuous deployment pipeline will handle the promotions, automatic or manual depending on your needs, and will execute the fastlane deploy lane to upload the build of your apps to TestFlight.
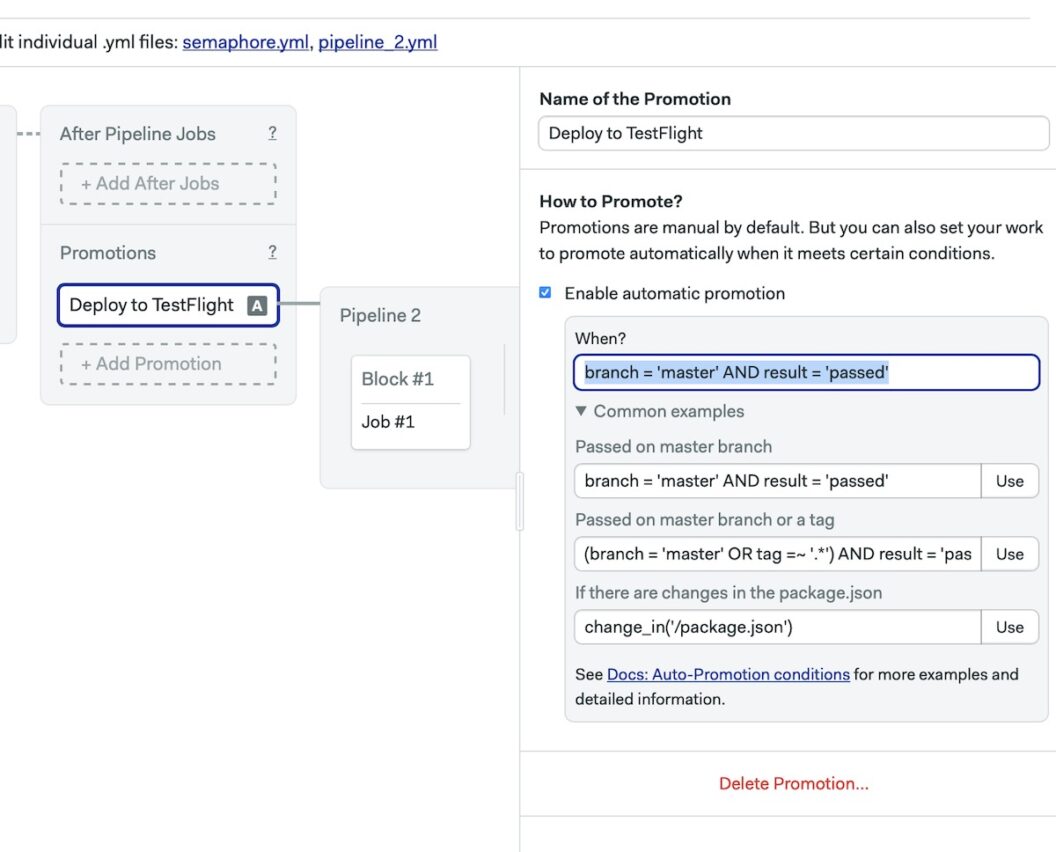
Set up promotion pipeline
This setup will automatically push your builds to TestFlight once changes have landed in the master or whatever branch you have designated.

Configuring the deployment pipeline
Similar to the Main pipeline, we will use a Mac-Based Virtual Machine environment with a macos-xcode13 image. Next, in this pipeline, you will also need an Install Dependencies block set up with a job called Install and cache Flutter:
checkout
cache restore flutter-packages-$SEMAPHORE_GIT_BRANCH-$(checksum pubspec.yaml),flutter-packages-$(checksum pubspec.yaml),flutter-packages
flutter pub get
cache store flutter-packages-$SEMAPHORE_GIT_BRANCH-$(checksum pubspec.yaml),flutter-packages-$(checksum pubspec.yaml),flutter-packages /root/.pub-cache

Next, create a block named Deploy to TestFlight with the job Run Fastlane:
checkout
cache restore flutter-packages-$SEMAPHORE_GIT_BRANCH-$(checksum pubspec.yaml),flutter-packages-$(checksum pubspec.yaml),flutter-packages
flutter build ios --no-codesign
cd ios
bundle install
cache store
bundle exec fastlane deploy

Finally, use the environment variables you previously created using the sem CLI.

Click Run the workflow and commit the changes.
Test deployment pipeline
First, merge the set-up-semaphore branch to master.
git fetch --all
git merge origin/set-up-semaphore
git push origin master
Next, push the changes to master to trigger automatic build promotions. And finally, check on App Store Connect to see if the build is successful.

This should be the final workflow of our app.

Final Words
Congratulations! You have successfully deployed your app to TestFlight. This should allow you to iterate on the features of your app faster without worrying too much about the manual aspect of doing releases, which is complex and time-consuming — saving you lots of development time!
Originally published at https://semaphoreci.com/blog/automate-flutter-app-deployment-on-ios-to-testflight-using-fastlane-and-semaphore on May 20, 2022.