Building features and beautiful UIs is a satisfying feeling, but shipping them to users should be the goal to keep in mind. Having your app tested by real users before public release is a critical part of the software development cycle. In this article, you will learn how to distribute your Flutter Apps (on Android) to your testers using Firebase App Distribution and automate your deployments using Semaphore.
Prerequisites
- An existing Flutter project or you can use our starter app or create one by running
flutter create my_app - A Firebase account or you can create one here
Firebase App Distribution
Firebase App Distribution allows you to ship your Flutter apps to trusted testers. Firebase App Distribution helps you get feedback quickly, deploy changes, and iterate without undergoing an app review process. Firebase App Distribution is part of Firebase and integrated well with other services like Crashlytics.
Firebase App Distribution vs Google Play and Apple Apps Store
Firebase App Distribution focuses on deploying apps to a limited number of users quickly (500 per project), so they can be tested and you can get feedback. It’s not, however, a replacement for the existing app stores (i.e. Google Play and Apple App Store) as a means of shipping apps to the public.
Creating a Firebase Project
In the console, create a new project by tapping Add project.
Assign a project name and unique ID (optional).
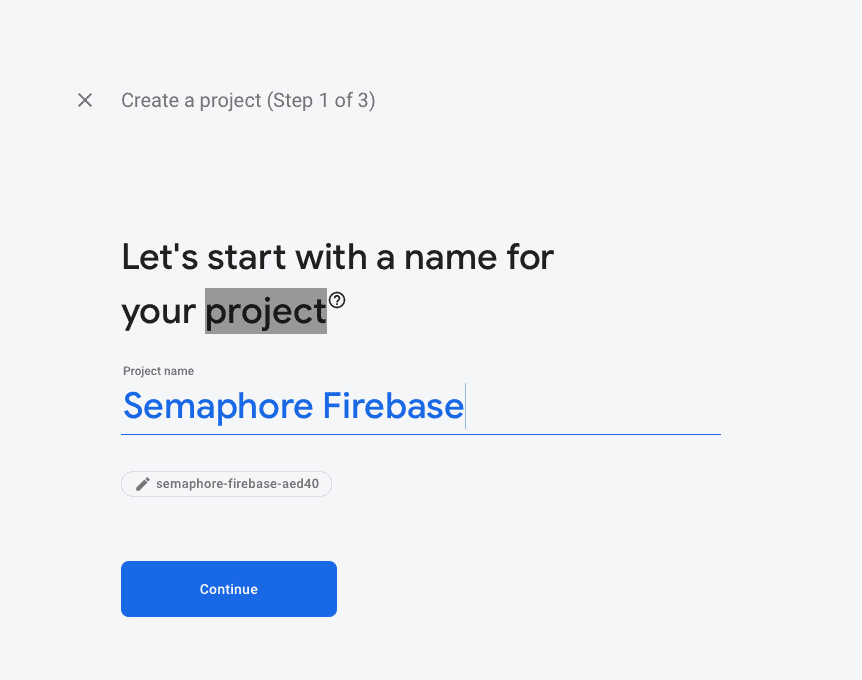
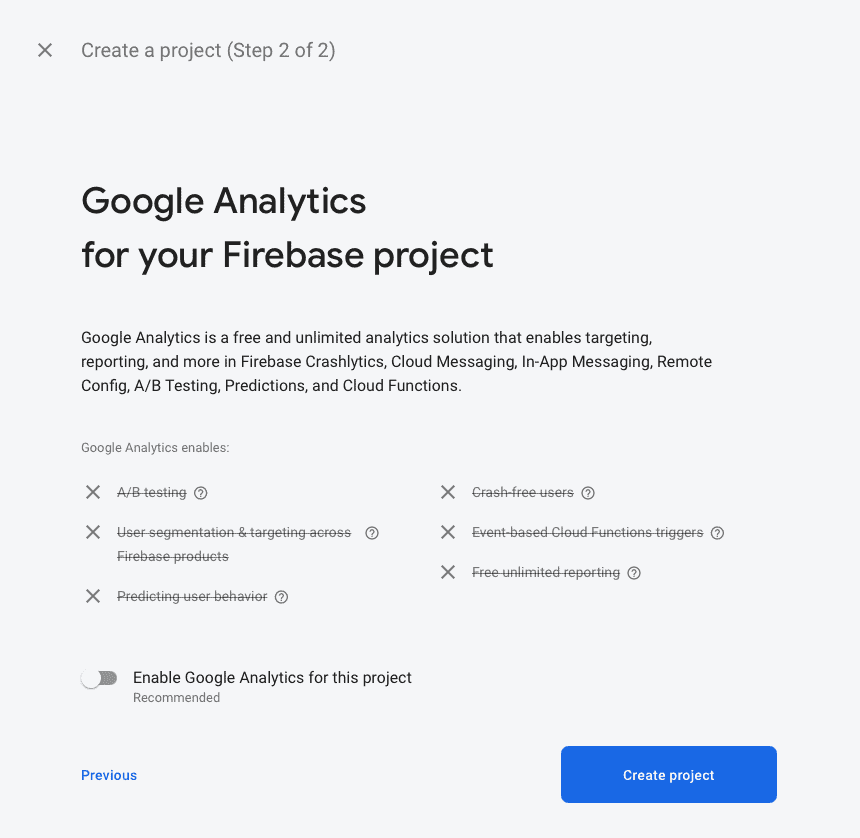
You can also enable Google Analytics (Optional). For now, we’ll disable this setting.
Authentication with Firebase CLI
Firebase CLI contains a set of tools that allows you to manage, view, and deploy to Firebase. We will use Firebase CLI to authenticate CI later when deploying builds to Firebase projects.
Setting up Firebase CLI
There are at least two ways to set up Firebase CLI on your machine. Either by downloading the standalone binary or via the npm package manager.
If you already have npm, you can go ahead and install Firebase CLI using the package manager, as shown below:
npm install -g firebase-tools
Testing and logging in with Firebase CLI
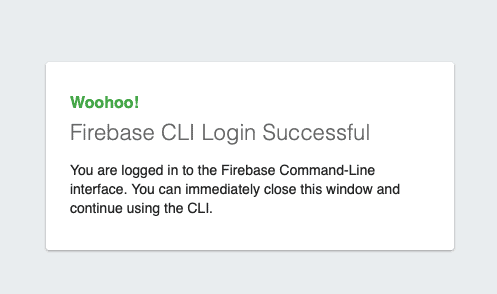
Authenticate Firebase CLI using the email associated with your Firebase account:
firebase login

✔  Success! Logged in as joshua*****@gmail.com
For more information, see Firebase CLI reference.
Setting up App Distribution
App Distribution in Firebase is where deployed builds show up and where you can manage your app testers.
Setting up an Android project
If you have an existing Flutter project that uses Firebase, feel free to skip this step. Otherwise, if you are using the starter app or have created a new project using flutter create, do the following.
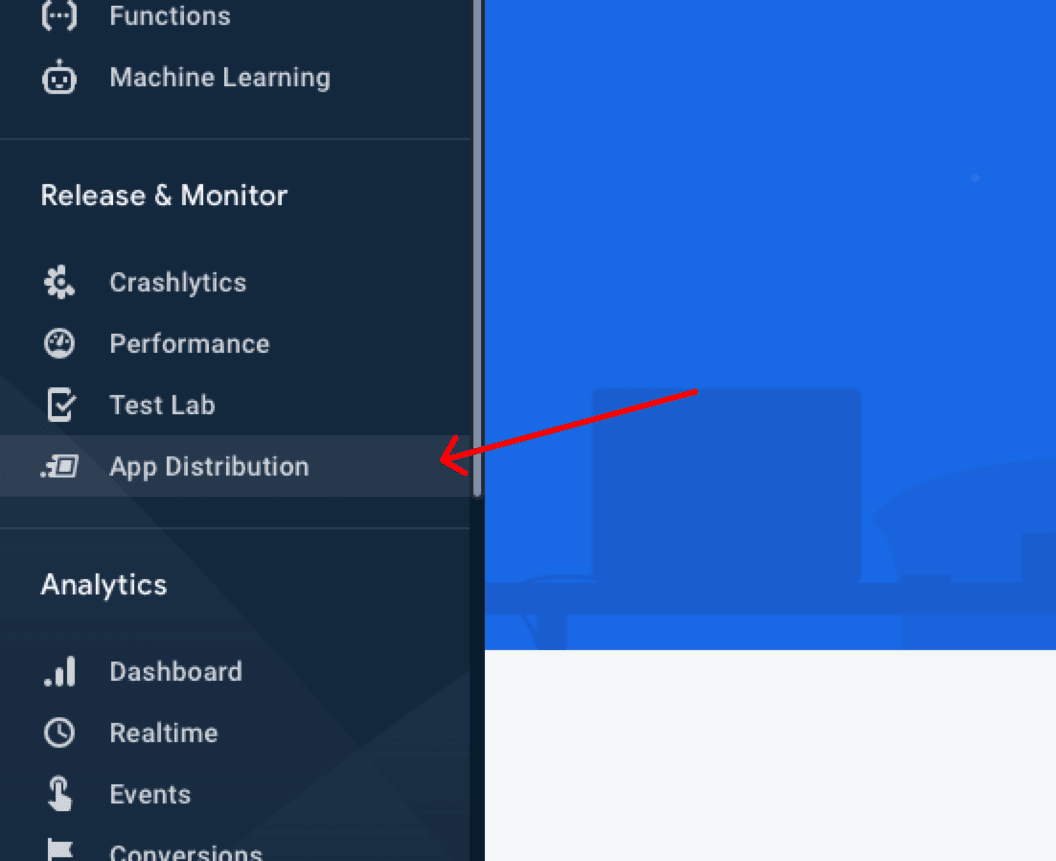
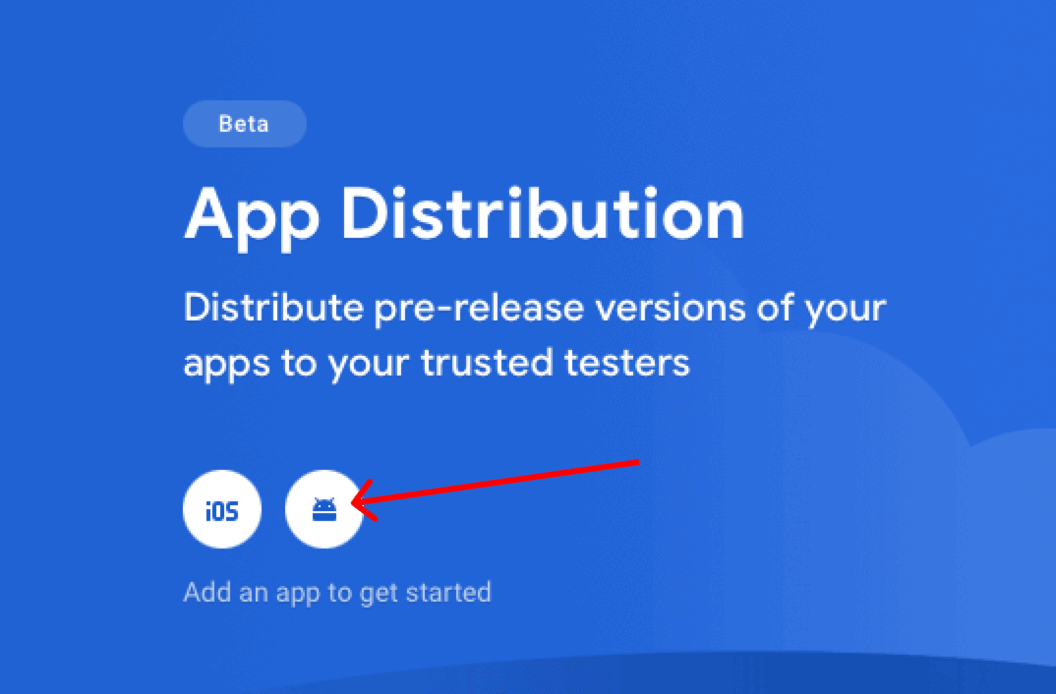
In the Firebase console’s sidebar, navigate to and open App Distribution.
Tap the Android logo to create a new Android project.
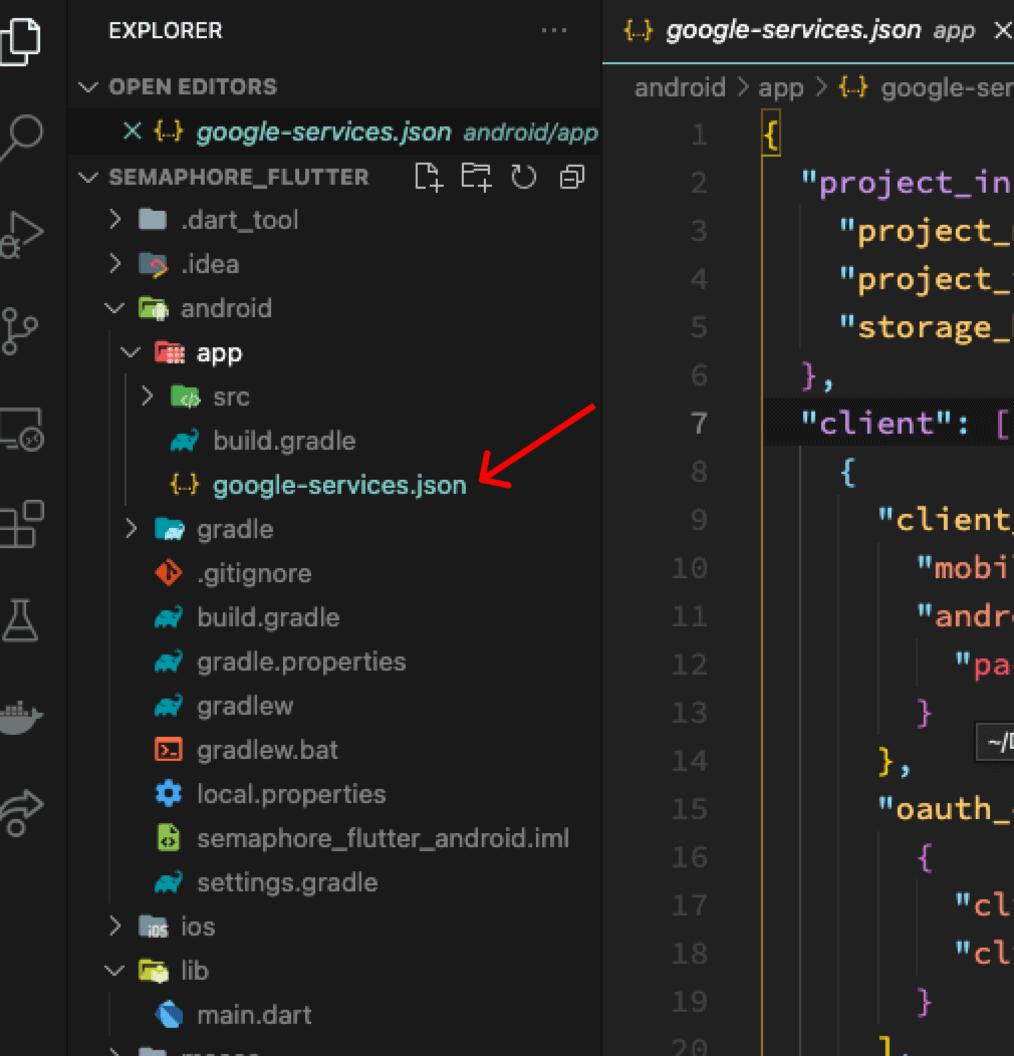
Then, enter the details of your Android project and download the google-services.json file.
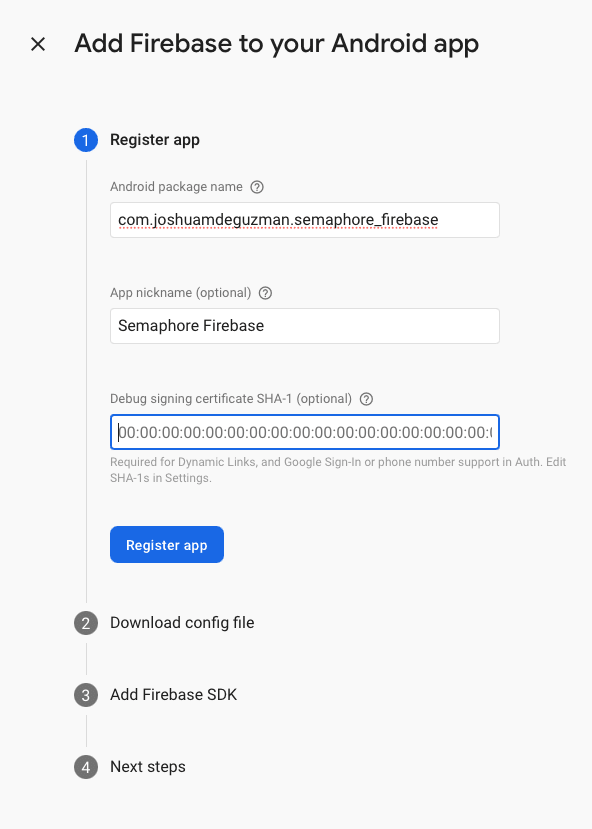
💡 I recommend setting the package name (bundle identifier in iOS) right away by running flutter create semaphore_flutter ****--org com.joshuamdeguzman.semaphore_flutter**** to avoid modifications that might lead to builds breaking later on if you don’t know what you are changing.
Last, add Firebase SDK to your Flutter project.
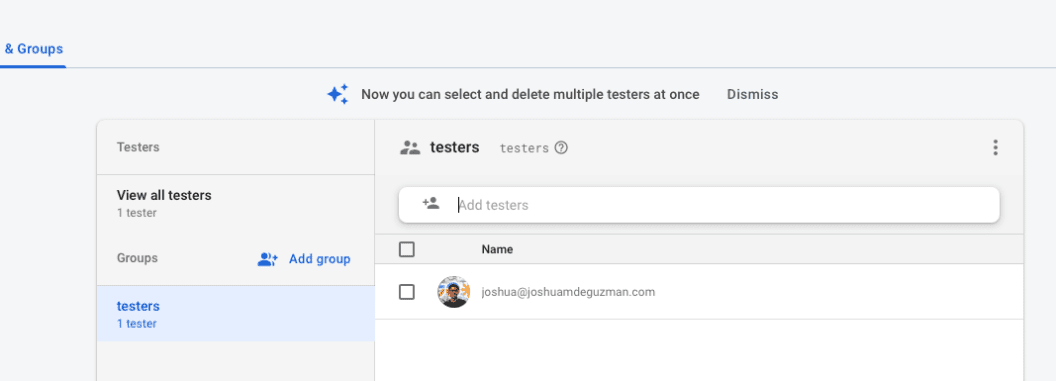
Setting up group testers
With App Distribution you can configure multiple test groups depending on the build you deploy, e.g. for internal or private beta builds.
Navigate to the App Distribution page and select the Testers & Groups tab****.****
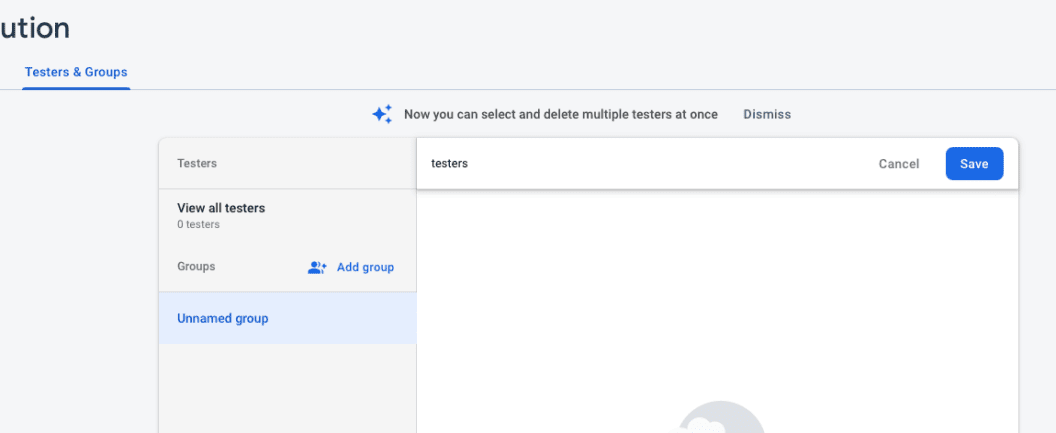
Add a group named “testers”, then click Save.
Last, to deploy your build to the users, add their emails to the group.
That’s it for Firebase for now. On to the next step
fastlane
fastlane is an open-source platform that has a wide range of tools and APIs for simplifying deployment for Android and iOS projects. We’re going to use fastlane to automate our workflow and communicate with Firebase, and ultimately to deploy the project.
Setting up Ruby
Ruby is a must-have to use fastlane in your project. fastlane is mostly written in Ruby, including the files where you define how workflows are set up, as well as fastlane dependencies. Here’s an exhaustive list of ways to install Ruby on your machine.
Setting up Bundler
Bundler and Gemfile are recommended when defining dependencies in fastlane. To install bundler, run the following command:
gem install bundler
Setting up fastlane
If you’re on macOS and have Homebrew installed, run the following:
brew install fastlane
If you have gems installed on macOS/Windows/Linux, run the following:
sudo gem install fastlane
Setting up fastlane with your Flutter Android project
Set up fastlane in the android directory of your Flutter project.
To initialize fastlane, run the following:
cd android && fastlane init && cd -
- Provide the package name when asked (e.g.
com.joshuamdeguzman.semaphore_flutter)
💡It’s recommended that you set the package name on initialization to avoid having to enter it every time you run fastlane.
- Press enter and skip when asked for the path to your json secret file
- Type `n` when asked if you want to download or upload metadata to Google Play
To complete the initialization, wait for all the packages and dependencies to be installed properly.
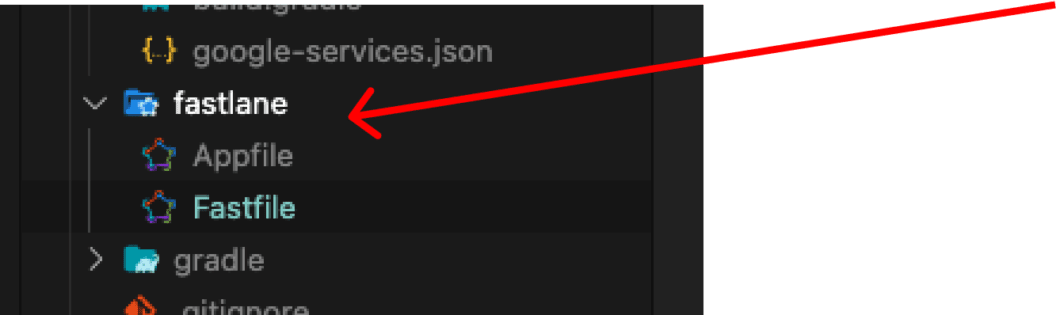
Great! You should now have a fastlane directory containing the Appfile and Fastfile.
Adding the Firebase App Distribution Plugin to Fastlane
We’re going to need the plugin to upload build artifacts to Firebase.
Install the fastlane plugin with the following command:
fastlane add_plugin firebase_app_distribution
Then, when asked to modify the Gemfile for the current path (android), type y.
💡In some cases, depending on how Ruby was set up on your machine, you might be asked to enter your password and provide temporary root privileges when installing the dependency. You can do this with the following command:
sudo fastlane add_plugin firebase_app_distribution
Setting up Fastfile with Firebase
Fastfile
Fastfile stores the configuration for automation using fastlane. It is located in the android/fastlane directory of your Flutter project.
Navigate to your Fastfile directory and replace the default content with the following:
# android/fastlane/Fastfile

default_platform(:android)

platform :android do
 desc "Deploy to Firebase"
 lane :deploy do
  begin
  # TODO: Add firebase app distribution command here
  end
 end
end
💡 deploy is the name of the fastlane workflow. To run the command in your terminal, run fastlane deploy.
Add the firebase_app_distribution command as shown below:
default_platform(:android)

platform :android do
 desc "Deploy to Firebase"
 lane :deploy do
  begin
   # (start) Add this
   firebase_app_distribution(
    groups: "testers",
    release_notes: "Bug fixes and improvements.",
    apk_path: "../build/app/outputs/flutter-apk/app-release.apk",
    firebase_cli_path: "/usr/local/bin/firebase",
    firebase_cli_token: <YOUR_FIREBASE_CLI_TOKEN>
    app: <YOUR_APP_ID>,
   )
   # (end)
  end
 end
end
💡The group “testers” must match one of the test groups you defined in App Distribution. Also, you can read changelog from a text file using release_notes_file and set the path to the file.
App ID
To get your App ID, navigate to Project Overview, then tap the cog icon to open the settings for your Android project.
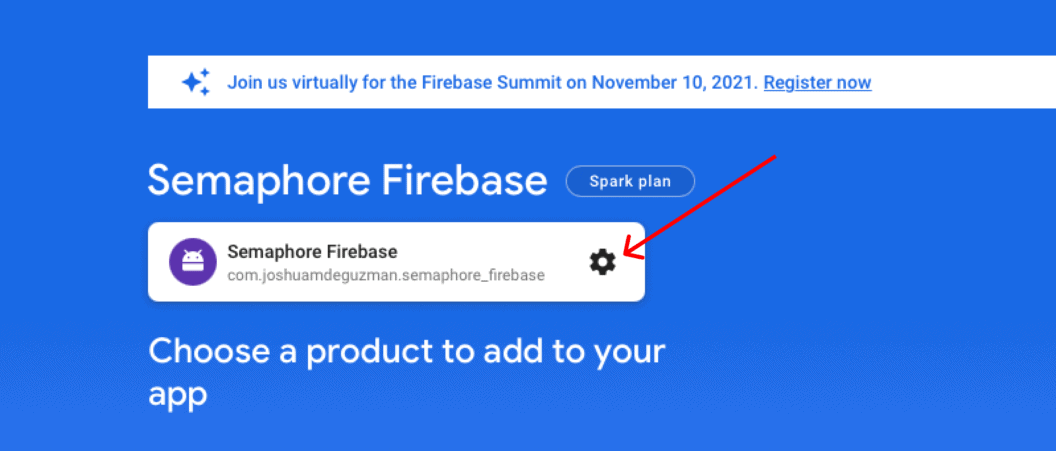
Next, copy your App ID from the App Project Settings.
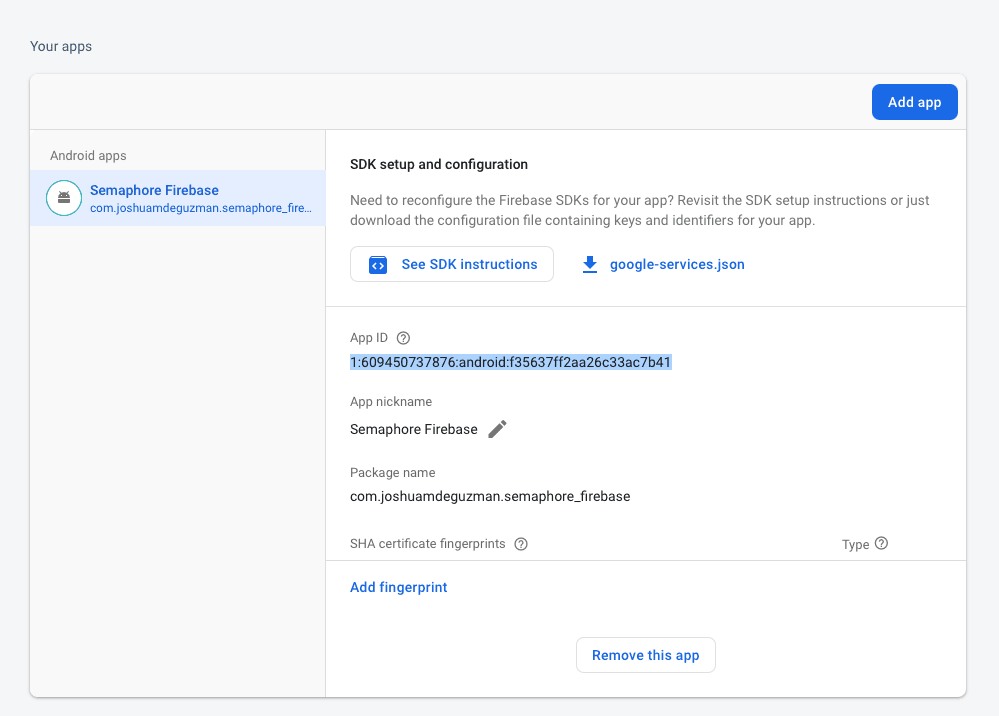
Last, set App ID in Fastfile as shown below:
default_platform(:android)

platform :android do
 desc "Deploy to Firebase"
 lane :deploy do
  begin
   # (start) Add this
   firebase_app_distribution(
    groups: "testers",
    release_notes: "Bug fixes and improvements.",
    apk_path: "../build/app/outputs/flutter-apk/app-release.apk",
    firebase_cli_path: "/usr/local/bin/firebase",
    firebase_cli_token: <YOUR_FIREBASE_CLI_TOKEN>
    app: "1:609450737876:android:f35637ff2aa26c33ac7b41", # Updated
   )
   # (end)
  end
 end
end
Generating Firebase CLI token
Earlier you authenticated Firebase CLI with your Firebase account; mainly for testing tooling installation. Now, we’re going to authenticate and generate a token for CI.
To generate a token for CI run:
firebase login:ci
This should give a hashed string like this:
✔  Success! Use this token to login on a CI server:

1//0etIq08H_oIB5CgYIARAAGA4SNwF-L9IrgmGb2iadCGcAmqhzK_NH8F8zQBkbPrMS2qtWhMqUmRbVbYK4YzC_83-eHb8NgylEMUg
Last, add the CI token to the firebase_cli_token parameter as shown below:
default_platform(:android)

platform :android do
 desc "Deploy to Firebase"
 lane :deploy do
  begin
   # (start) Add this
   firebase_app_distribution(
    groups: "testers",
    release_notes: "Bug fixes and improvements.",
    apk_path: "../build/app/outputs/flutter-apk/app-release.apk",
    firebase_cli_path: "/usr/local/bin/firebase",
    firebase_cli_token: "1//0etIq08H_oIB5CgYIARAAGA4SNwF-L9IrgmGb2iadCGcAmqhzK_NH8F8zQBkbPrMS2qtWhMqUmRbVbYK4YzC_83-eHb8NgylEMUg"
    app: "1:609450737876:android:f35637ff2aa26c33ac7b41", # Updated
   )
   # (end)
  end
 end
end
Deploying to Firebase using fastlane locally
Now that Firebase, group testers, and fastlane are set up, the next thing we have to do is to test the deployment locally using fastlane.
It’s important to understand that whenever possible, we test, build, and deploy our apps in a clean state. To do that, run the following in your terminal:
flutter packages & clean
Then build the Android apk in release as shown below:
flutter build apk --release
Now for deployment, you have to run the fastlane workflow:
cd android && fastlane deploy && cd -
This should give you a success message for deploying your app to Firebase.
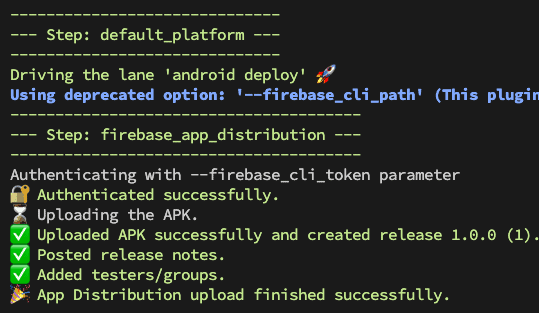
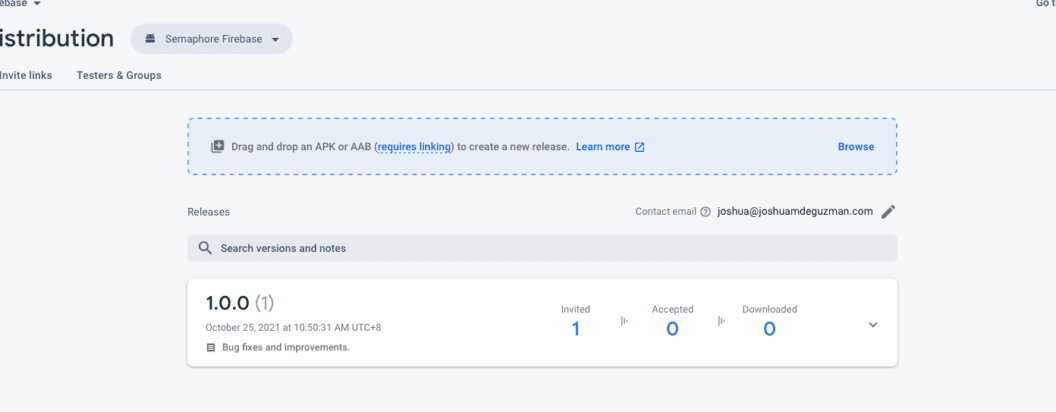
Amazing! The releases should now be displayed on your Firebase console.
Deploying to Firebase using Semaphore
Before diving into the next steps, I recommend reviewing the overview of the core concepts that make Semaphore intuitive and robust. In this article, I also explained the workflow builder concepts to help you understand the Visual Builder.
Setting up a Semaphore project for your app
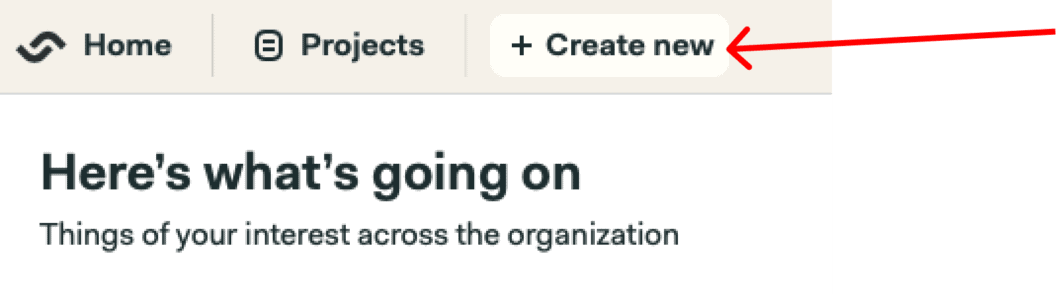
Log in with your Semaphore account, then create a new project.
Choose the repository for your project, then click Continue to workflow set up.

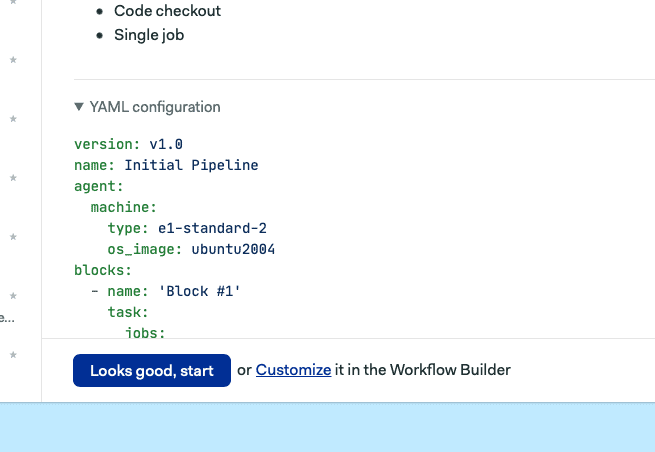
Then for the workflow set up, click Customize.
Setting up a job to build your Flutter apps
Configuring the workflow pipeline
We’ll be using a Docker Container for the environment with an android:30-flutter Docker image.
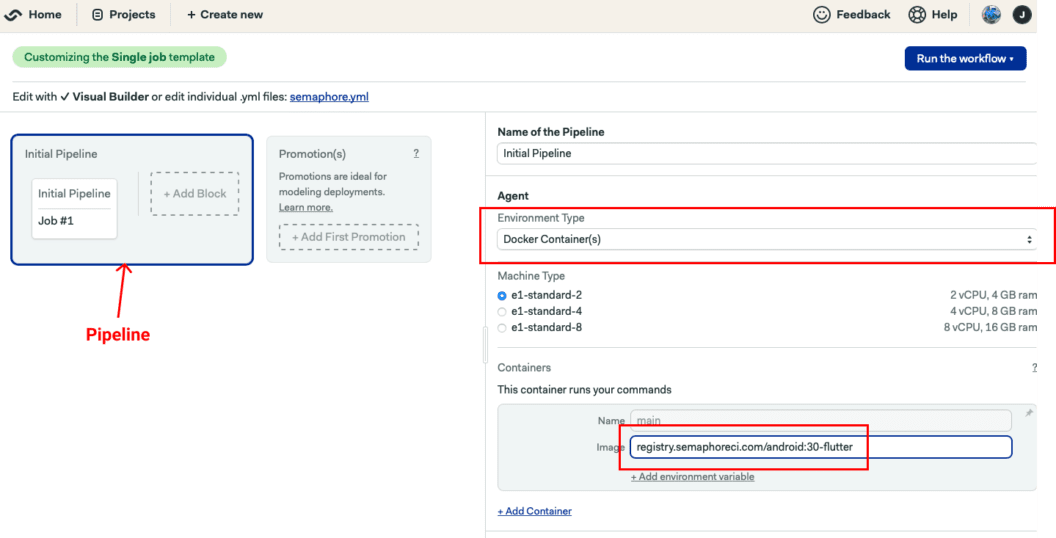
See this for the list of supported images in the Semaphore Container Registry.
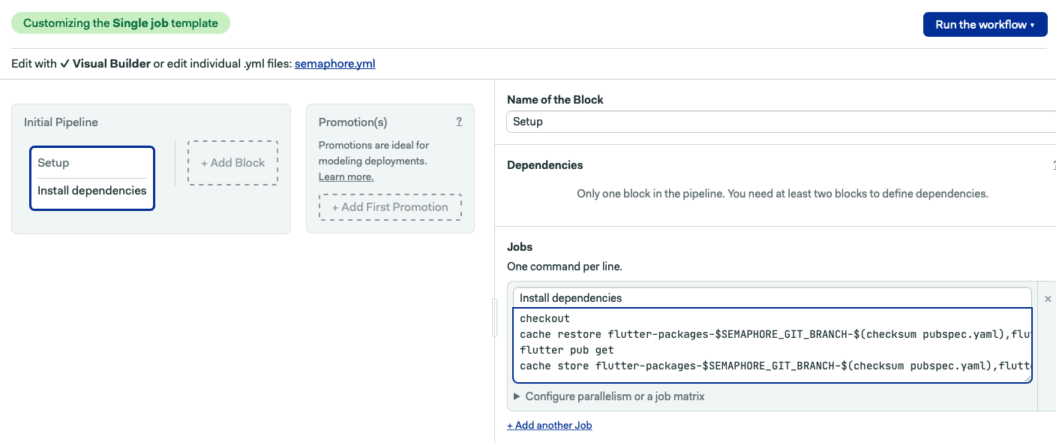
Setting up a block for installing dependencies
After setting up the environment, we’re going to checkout the repository. Then, install Flutter and its dependencies. Last, we will also cache Flutter to store and re-use it between runs.
Add the following code to the Jobs section under the job named Install dependencies:
checkout
cache restore flutter-packages-$SEMAPHORE_GIT_BRANCH-$(checksum pubspec.yaml),flutter-packages-$(checksum pubspec.yaml),flutter-packages
flutter pub get
cache store flutter-packages-$SEMAPHORE_GIT_BRANCH-$(checksum pubspec.yaml),flutter-packages-$(checksum pubspec.yaml),flutter-packages /root/.pub-cache
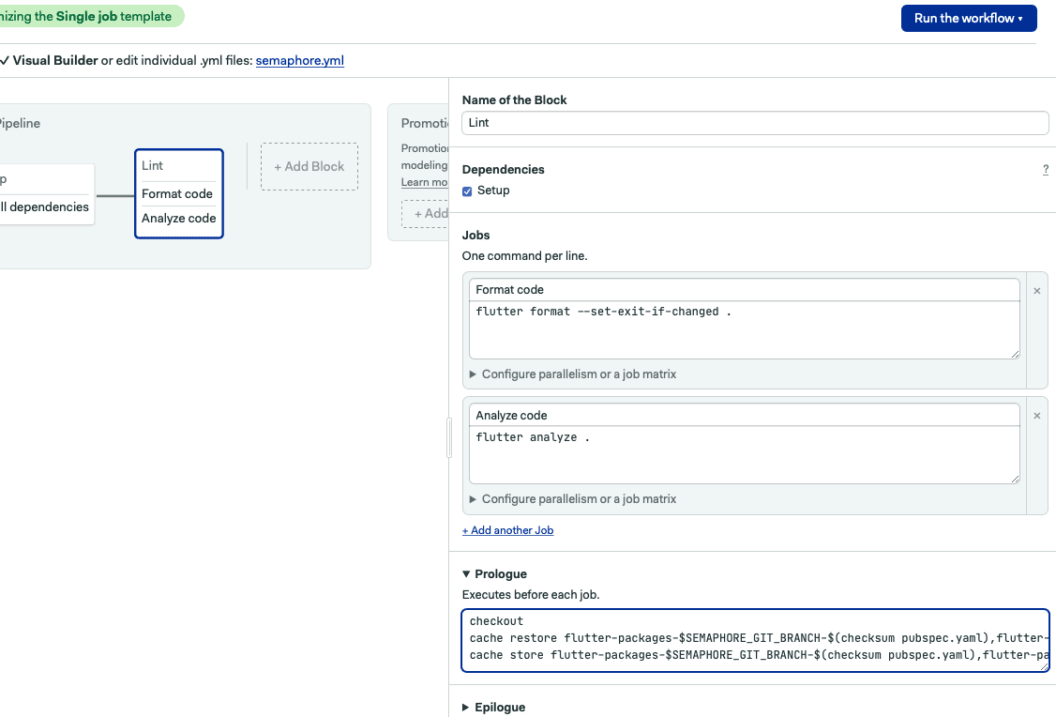
Setting up a block for code linting and formatting
This is where we are going to do code quality checks. To add this job, click + Add Block.
Create two jobs, one for Format Code and Analyze Code.
To format the code, add the following:
flutter format --set-exit-if-changed .
Then, to analyze the code, add the following:
flutter analyze .
Last, to use the cached Flutter dependencies, add the following code to the Prologue section:
checkout
cache restore flutter-packages-$SEMAPHORE_GIT_BRANCH-$(checksum pubspec.yaml),flutter-packages-$(checksum pubspec.yaml),flutter-packages
cache store flutter-packages-$SEMAPHORE_GIT_BRANCH-$(checksum pubspec.yaml),flutter-packages-$(checksum pubspec.yaml),flutter-packages /root/.pub-cache
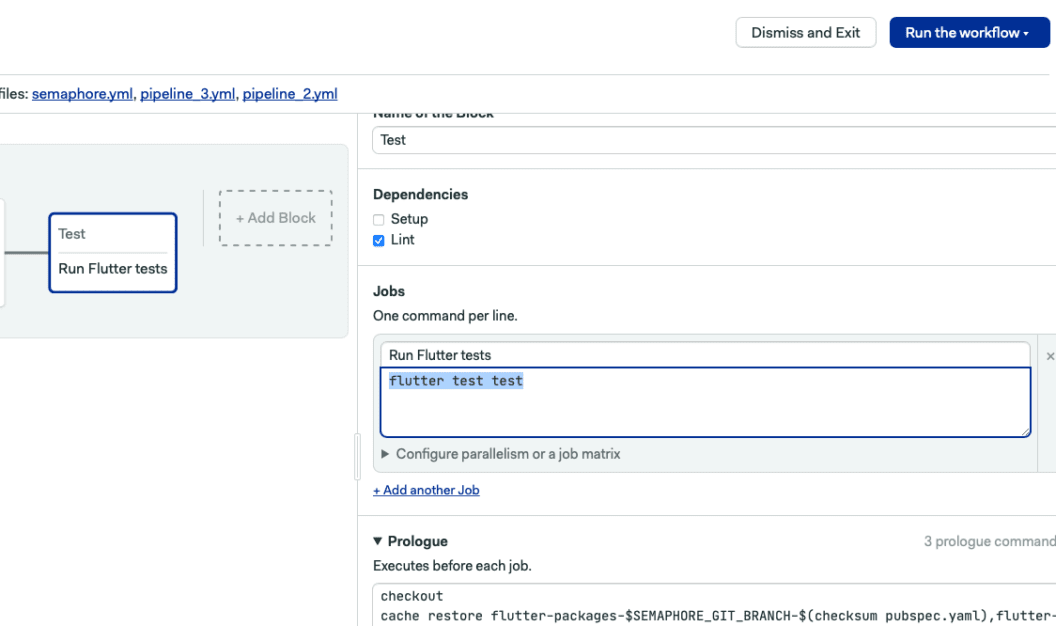
Setting up a block for running tests
To ensure that your app is working based on the tests you’ve written, we can create a new block for testing.
To test your code, add the following:
flutter test test
Last, add the following code to the Prologue section to use the cached dependencies:
checkout
cache restore flutter-packages-$SEMAPHORE_GIT_BRANCH-$(checksum pubspec.yaml),flutter-packages-$(checksum pubspec.yaml),flutter-packages
cache store flutter-packages-$SEMAPHORE_GIT_BRANCH-$(checksum pubspec.yaml),flutter-packages-$(checksum pubspec.yaml),flutter-packages /root/.pub-cache
Adding a job to deploy your Flutter apps to Firebase
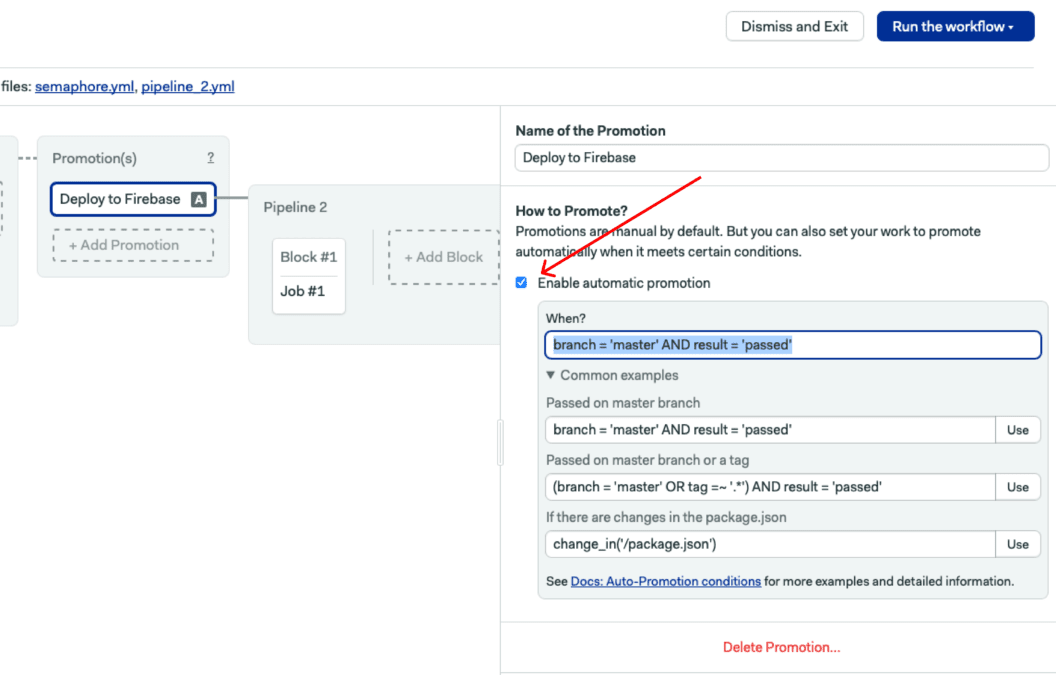
Setting up a new promotion
Promotions help us create conditions around our workflows. They can be triggered manually or automatically.
Once done with the visual builder, we can merge the set-up-semaphore branch to the default branch for continuous deployment via automatic promotions. In our case, the Deploy to Firebase promotion gets triggered once the condition "branch = 'master' AND result = 'passed' is satisfied by the run.
Configuring the environment for the new pipeline
Similar to the Initial Pipeline that we made, set the environment type to a Docker Container with an android:30-flutter Docker image.
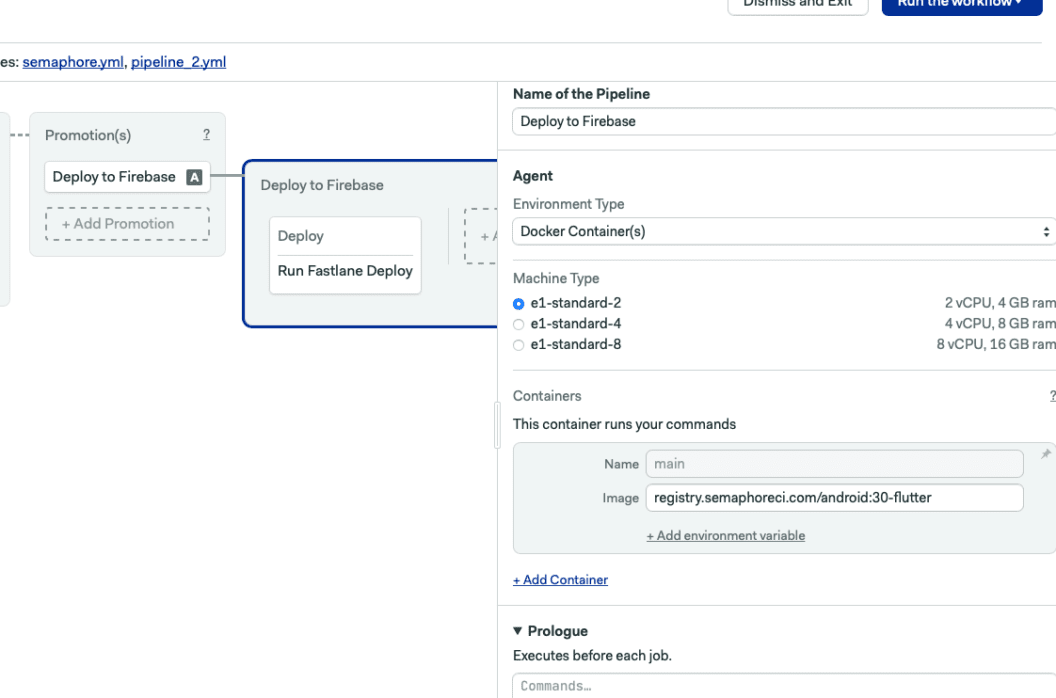
Setting up block for building and deploying the app
This is where we are going to first execute our fastlane command.
To create a release APK using Flutter, add the following:
flutter build apk --release
Then, add the following to execute our fastlane command:
bundle exec fastlane deploy
Last, add the following code to the Prologue section of the block:
checkout
cache restore flutter-packages-$SEMAPHORE_GIT_BRANCH-$(checksum pubspec.yaml),flutter-packages-$(checksum pubspec.yaml),flutter-packages
cd android
bundle install
cache store
Merging the set-up-semaphore branch to the default branch
To satisfy the conditions we set in automatic promotions, one of which is pushing changes to the master branch, we should merge it to the working branch we use for the visual builder, as shown below:
git fetch --all
git merge origin/set-up-semaphore
git push origin master
Now, push the changes to trigger the build.

You can also download the final project here.
Conclusion
Deploying your app to internal or public beta testers is critical for determining broken features. In addition, deploying an app to testers allows you to gather feedback on improving your product overall. That’s it! Automating your pipeline to deploy to Firebase with Semaphore is straightforward.
You can also look into Semaphore promotions if you plan to deploy to multiple Firebase tester groups.
[
Deploy Flutter Apps on Android to Testers Using Firebase App Distribution with Semaphore
In this article, you will learn how to distribute your Flutter (Android) Apps to your testers using Firebase App Distribution, and automate your deployments using Semaphore.
![]() Joshua de GuzmanTwitter
Joshua de GuzmanTwitter
](https://semaphoreci.com/blog/flutter-apps-android?ref=joshuamdeguzman.com)
Originally published at https://semaphoreci.com/blog/flutter-apps-android on November 3, 2021.